As the saying goes, Time Is Money, this saying is particularly relevant in the snow plowing industry. Hooking up your snowplow with ease and speed, helps you get out on the road faster to begin your snow removal jobs.
Many snowplow professionals choose the BOSS brand of snowplows because of the ease of the attachment system. The simple three step hydraulic powered attachment system, called SmartHitch2, makes the Flip, Plug and Click method a favored choice.
In addition, to SmartHitch2, THE BOSS offers an optional Snowplow Sight System kit to aid in the alignment of the truck making the attachment system even faster and easier. For under $15, this optional accessory allows you to align your truck and plow for hookups on the first try, every time.
Installation of the Snowplow Sight System is simple and these step by step instructions and video will guide you through the process.
How To Install The Snowplow Sight System
Snowplow Sight System Installation Instructions
1. Begin by aligning pushbeam with coupler. Do not attach plow to truck. The coupler should remain in the unattached, down position.
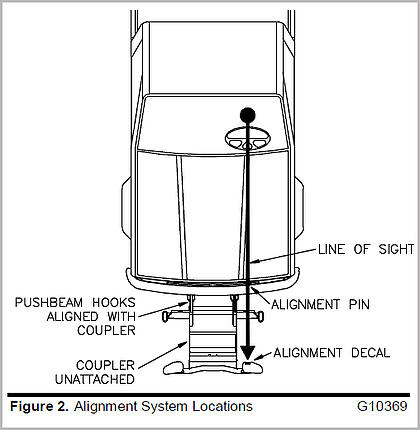
2. Sit inside truck in a normal driving position. Locate a spot for Sight Pin on truck hood
directly behind the plow driver side headlight. See Figure 2.

3. Use a piece of tape to temporarily attach Sight Pin to truck grille or underside of truck hood at the spot you located in the previous step.
4. Use a piece of tape to attach Sight Decal to back side of plow driver side headlight. The
center “V” shape of Sight Decal should be aligned with Sight Pin when you are sitting in your normal driving position inside the truck.
5. Check alignment of Sight Pin and Sight Decal from inside truck. Adjust as necessary.
Note: Before permanently attaching Sight Pin and Sight Decal it is recommended that you try backing the truck away from the plow and aligning the plow and truck using the temporarily installed Boss Snowplow Sight System. Once Sight Decal has been applied to the headlight, you will NOT be able to move it.
6. When you have finished your adjustments, drill a 3/16” hole on both ends of Sight Pin attachment loop in truck grille or underside of truck hood. Secure with two ¼”-20 X ¾” Self-Tapping Screws and two ¼” Flat Washers.
7. Mark current location of Sight Decal on back of plow headlight.
8. After marking the location of Sight Decal, remove Sight Decal and wash the area
beneath it with a wet cloth. Be sure the area is completely dry before proceeding.
9. Remove backing of Sight Decal and apply to back of plow headlight.
10. Trim Sight Pin to a preferred height.
11. Install Sight Cap on Sight Pin.


